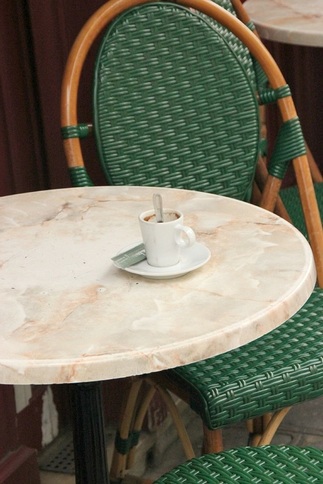
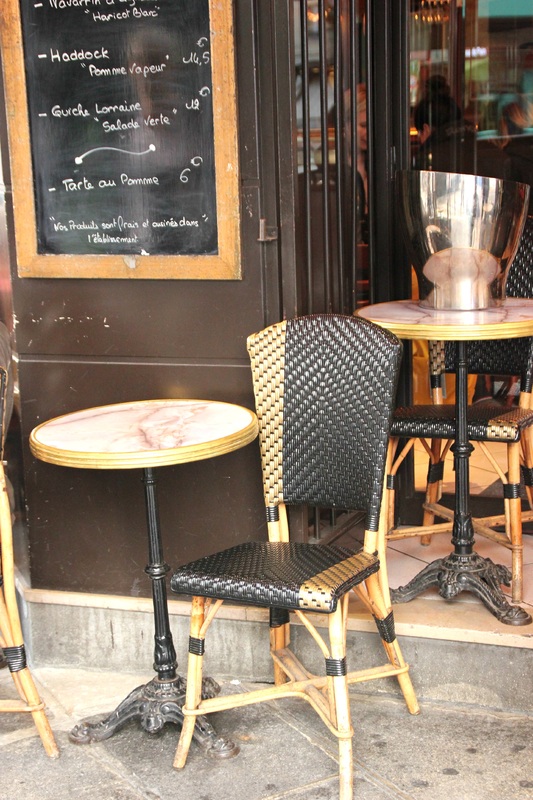
 It's been a week now since I've returned from Paris. Usually I'll have a period for several days of still being there in my thoughts -- as if I'm still in Paris; somewhat of a mindful afterglow. But upon arriving home I almost immediately began caring for a family member with pneumonia -- quite a scare. With my sister now on the mend, fortunately, I have been scrolling through the 1200+ photos on my camera, and what I discovered is -- a large percentage is devoted to French outdoor cafés. ( And why must I go blocks [if not miles] to sit at a café or find a decent pastry shop at home?). I guess that's one of the things I love about Europe and why I always find myself longing to return. Below is just a small sampling of the tables and chairs that caught my eyes on the streets of Paris. So lovely... 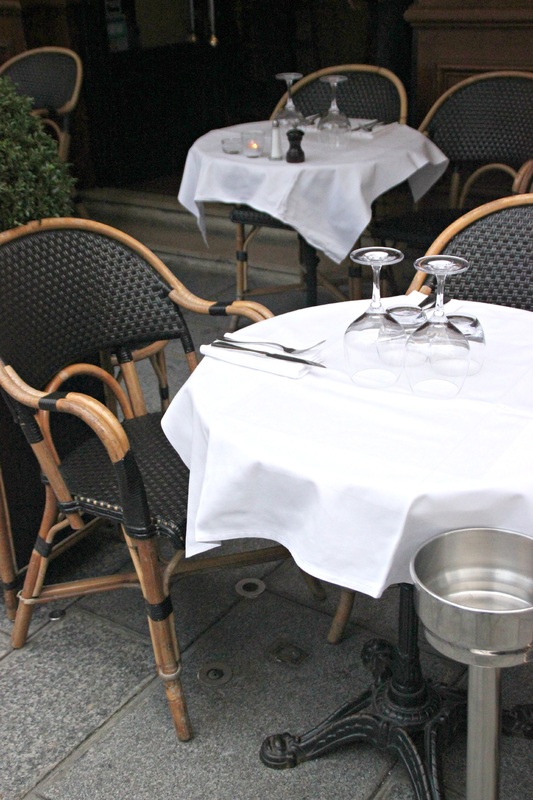
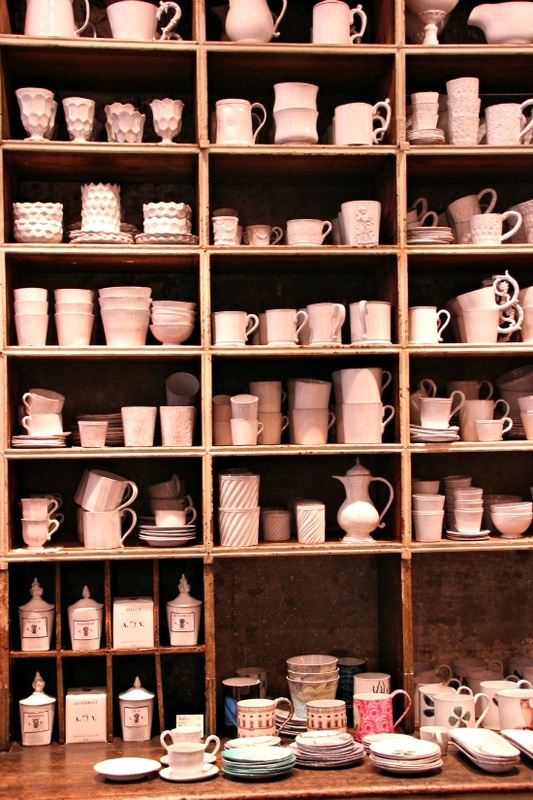
  One of my favorite shops to visit when in Paris is Astier de Villatte. I first discoved AV in 2000 at a small storefront on Rue du Bac. That location is now shuttered, but the flagship is on the Right Bank at 173 Rue Saint Honoré. I always stop by and just look. The joint venture between art students Benoit Astier de Villatte and Ivan Pericoli began by designing white handmade ceramic tableware and furniture and has expanded from there. I can only describe the centuries-old Paris shop as enchanting.
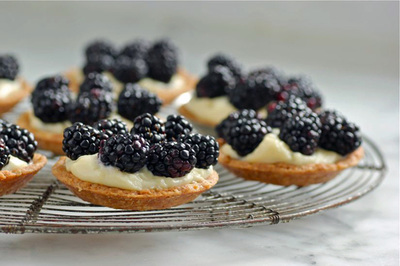
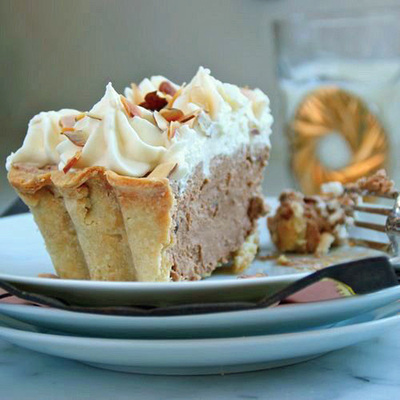
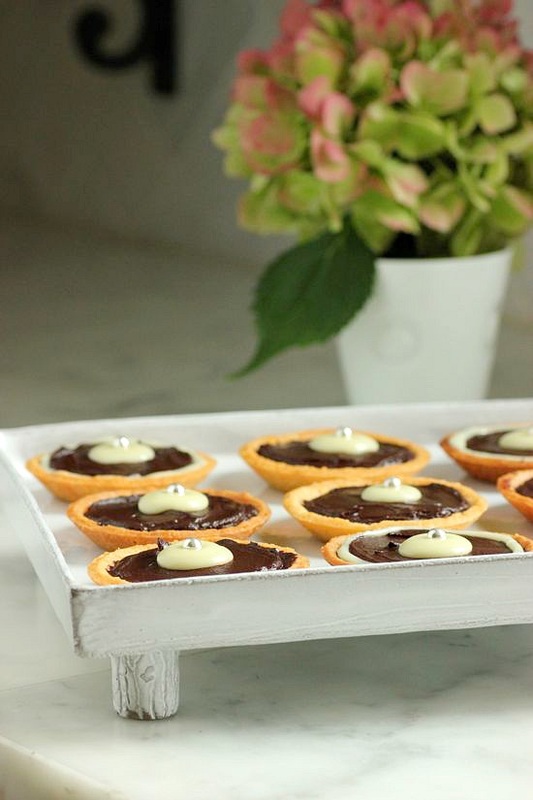
 The tartlets above have a crust of Pâte Sucrée (rich, sweet shortcrust tart pastry) and a filling of Orange Marmalade and Chocolate Ganache with Grand Marnier. After my husband ate a tart made with Pâte Sucrée in Paris, that is probably all I will be allowed to bake in my kitchen! I recommend a low percentage bittersweet chocolate in the ganache, or even a semi-sweet chocolate. Pâte Sucrée/recipe by Regan Daley • 1 1/4 cups all-purpose flour • 1/2 cup confectioners' sugar • 1/4 teaspoon salt • 8 tablespoons unsalted butter, chilled, cut into small pieces • 2 large egg yolks, lightly beaten 1. Combine the flour, sugar, and salt in the bowl of a food processor fitted with a steel blade. Pulse several times just to blend the dry ingredients. Add the cold butter and pulse until the size of fat peas. Add the lightly beaten egg yolks and pulse two or three times, just until the mixture looks moist and crumbly and comes together in a clump when you squeeze it. If the mixture seems very dry, lightly beat one whole egg in a separate bowl and add up to half of this to the dough, pulsing until incorporated. The dough should be moist but still crumbly. 2. Dust your fingers with flour and press the dough evenly over the bottom and up side of a 10-11-inch tart pan with removable bottom (or into 2-inch tartlet pans, as I've done). Wrap the pan(s) and pastry carefully in plastic wrap and refrigerate for 2 to 3 hours, at least. 3. Preheat oven to 375˚F. Prick the bottom of each chilled tart shell all over with a fork. Line the pastry with a piece of aluminum foil and fill the liner with rice. Bake for 15 minutes, or until the edges are just coloring, and the bottom of the pastry is beginning to cook. Remove the foil and rice and return the shell(s) to the oven until lightly browned all over. Chocolate Ganache • 1/2 cup heavy cream • 4 ounces finely chopped dark chocolate • 1 tablespoons butter • 1 tablespoon Grand Marnier 1. Bring cream just to a boil in a saucepan over medium-high heat. Pour cream over chocolate in a heatproof bowl. Let stand for 2 minutes. Add butter, then whisk mixture until smooth. Add Grand Marnier and whisk in. Let cool, stirring often. Use immediately. Assembly of Tarts • Orange Marmalade • 1/4 cup chopped white chocolate • heavy cream 1. After pulling the tart shells from the oven, brush each of the bottoms with a teaspoonful of orange marmalade. Gently spread the Chocolate Ganache over the marmalade. 2. Melt the white chocolate over low heat or in a microwave oven with enough heavy cream to make it piping consistency. Fill a small zip-lock bag with the melted chocolate and make a tiny cut at one of the corners of the bag. Pipe a disk of the white chocolate onto the chocolate ganache and decorate with a silver dragée, if desired. TAKE a LOOK:
0 Comments
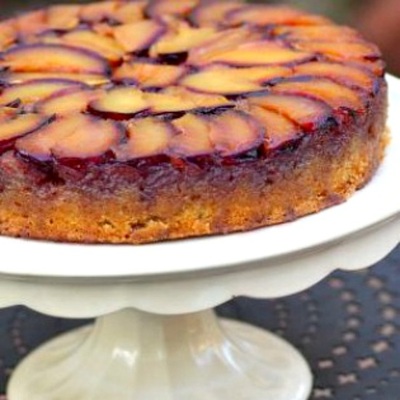
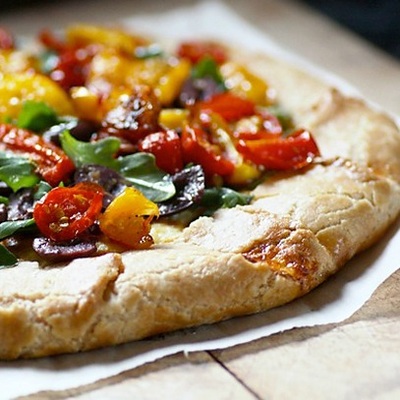
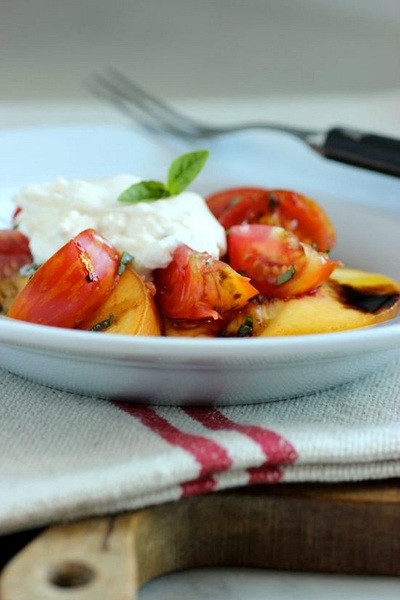
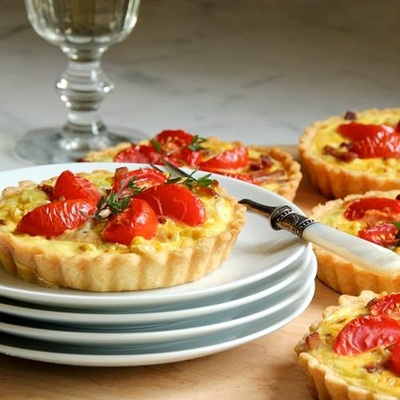
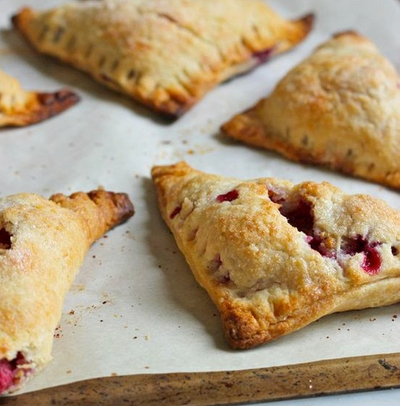
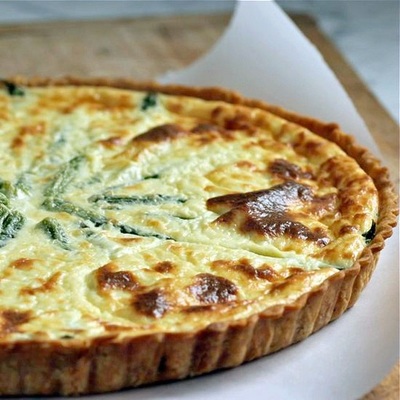
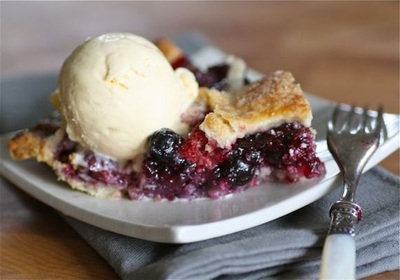
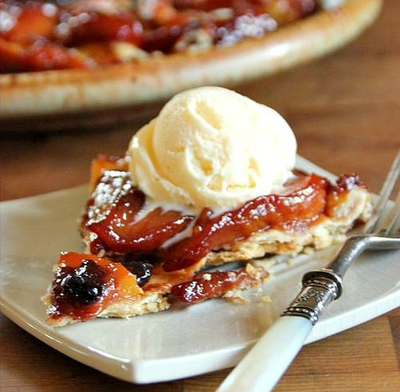
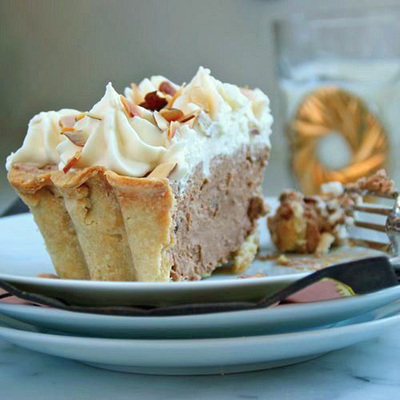
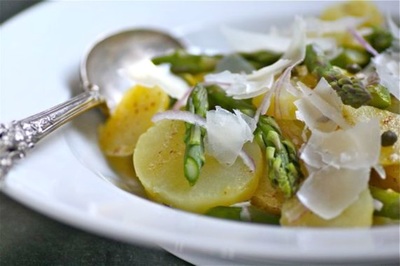
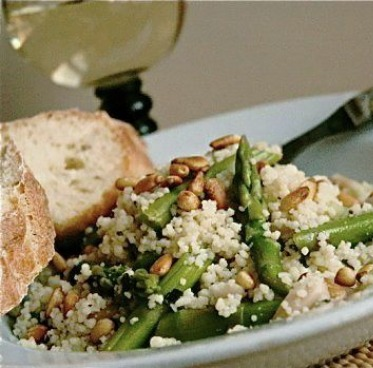
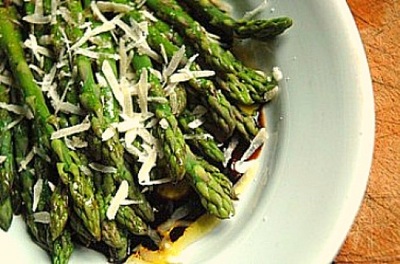
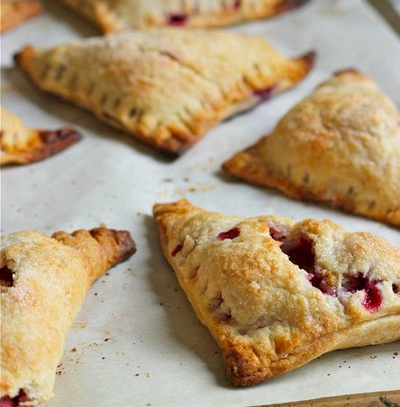
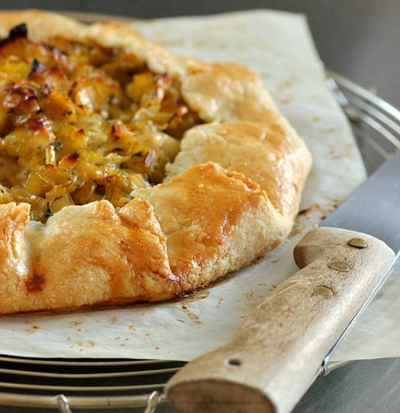
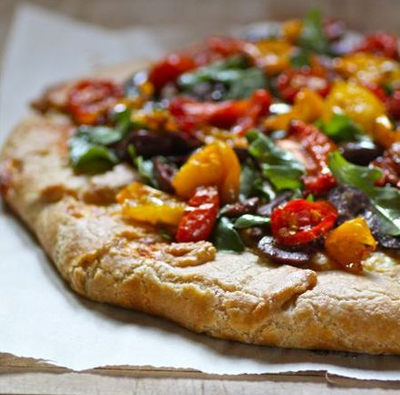
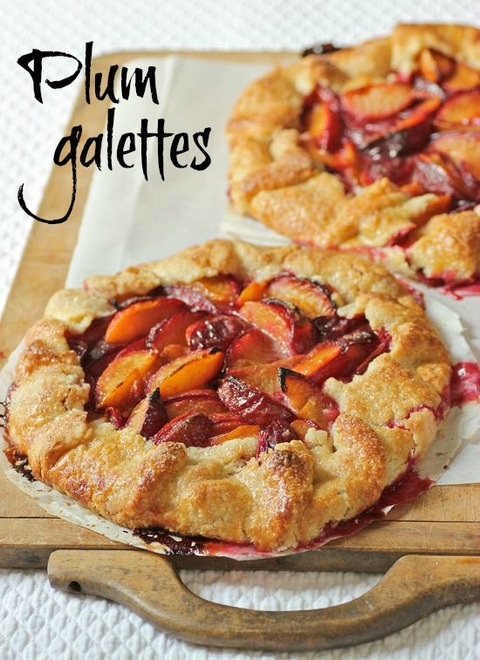 Making the most of end-of-summer stone fruit. I just made my first plum dessert of the season... two Rustic Plum Galettes that were served with scoops of freshly-made ice milk. Consider baking two of these free-form tarts. You'll want big slices (and leftovers for breakfast!). 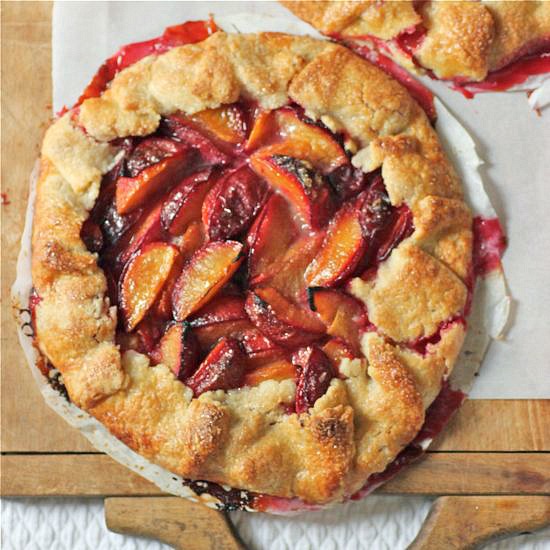  ... adapted from Bon Appetit | June 2001 CRUST • 1 1/4 cups unbleached all-purpose flour • 2 tablespoons sugar • 1/4 teaspoon salt • 1/2 cup cold unsalted butter, cut into 1/2-inch pieces • 3 tablespoons (approximately) ice water FILLING • 1 1/2 pounds plums, halved, pitted, and each half cut into 6 wedges • 5 tablespoons granulated sugar • 1/2 teaspoon ground ginger • 1/4 teaspoon ground cinnamon • 1 tablespoon flour • 2 tablespoons unsalted butter, melted • 1 egg, beaten to blend (for glaze • Turbinado sugar for sprinkling FOR THE CRUST... 1. Blend flour, sugar, and salt in processor. Add butter and pulse until mixture resembles coarse meal. Add 2 tablespoons ice water; blend until moist clumps form, adding more water by teaspoonfuls if mixture is dry. Gather dough into ball; flatten into disk. Wrap dough in plastic and refrigerate at least 1 hour. FOR THE FILLING... 1. Preheat oven to 400˚F. 2. Toss plums, 4 tablespoons sugar, ginger and cinnamon in bowl. Roll out dough on floured surface to 12 1/2-inch round. Transfer to rimmed baking sheet. Mix 1 tablespoon sugar and 1 tablespoon flour in small bowl; sprinkle over dough, leaving 2-inch plain border. 3. Scoop the plums on top of the pastry round, leaving a 2-inch plain border; drizzle with melted butter. Gently fold dough border in toward center, pleating the dough as you go. Brush border and underneath the pleats with the egg glaze. Sprinkle (generously, if you like) with turbinado sugar. 4. Place galette on the middle rack of oven and bake until plums are tender and crust is golden, about 45 minutes. Makes 1 galette that serves 5-6 TAKE a LOOK: 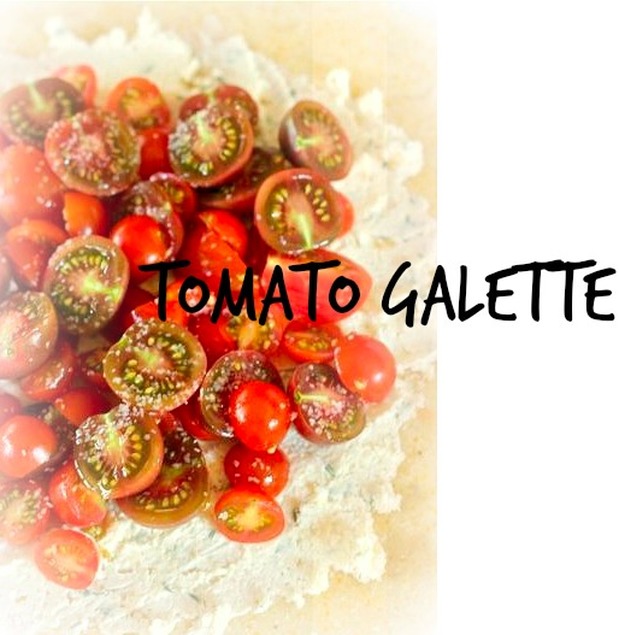 The morning began with thoughts of tomatoes. It is after all, August. I also had a pound of fresh ricotta that I made the day before. I was already thinking, ricotta and tomatoes. Colorado peaches were initially considered. Tomatoes combined with fresh peaches are one of summer's highlights for me. I wanted to make a free-form tart, but the peaches might be too juicy. Scratch the peaches. So, this is what I ended up with for our dinner last night on the patio (along with that ratatouille I made the day before) -- a galette of just tomatoes and ricotta (with a few Nicoise olives thrown in). Can't go wrong with that! 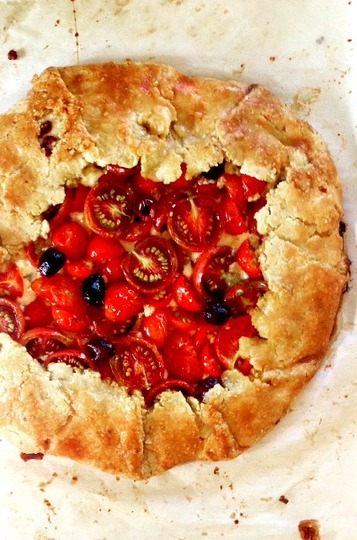 I stirred fresh thyme leaves from my garden into the fresh ricotta that was combined with Parmesan. The mixture was spread over the most delicate coarse-ground cornmeal crust. I'm crazy about baking cornmeal pastry with fruits and vegetables, but this one does take patience. If you don't feel like tackling a crust this delicate, eliminate the cornmeal and substitute with flour... or, use 1/4 cup cornmeal instead of the 1/2 cup I call for in the recipe. But I'll walk you through it. Like I said... it just takes patience. 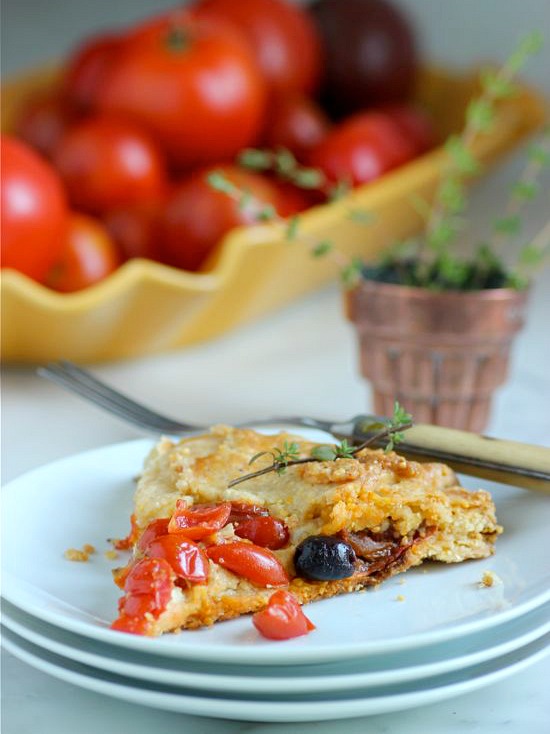 I'm making this galette again this upcoming weekend, and I may add those peaches... 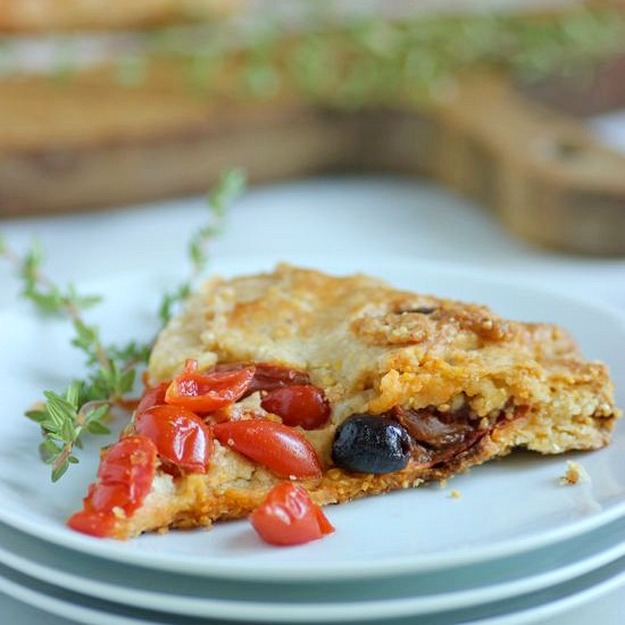  CRUST: • 1 cup all-purpose unbleached flour • 1/2 cup cornmeal • 1/2 teaspoon kosher salt • 1/2 cup (8 tablespoons) cold, unsalted butter, cut into 1/2-inch cubes • 4 tablespoons ice water FILLING: • 1/2 cup fresh ricotta • 1/2 cup grated Parmesan • 1 teaspoon fresh thyme leaves • 2 pints cherry tomatoes, mixed varieties, preferably heirloom • 1 egg whisked, for brushing • 15 (more or less) Nicoise olives • Kosher or sea salt • Extra-virgin olive oil, for drizzling 1. Combine the flour, cornmeal, and salt in the bowl of a food processor and pulse 2 or 3 times. Add the butter and pulse again until the size of small peas. While pulsing, slowly add the ice water until the mixture just starts to come together. Transfer the dough to a sheet of plastic, press into a disk and wrap. Chill dough for at least 2 hours. 2. Take dough from refrigerator. Cut a piece of parchment paper; place on a work surface and lightly dust with flour. Center the dough on the parchment, dust lightly with flour and cover with the plastic wrap. Roll the pastry into a round just under 1/4-inch, dusting with flour as needed. Slice the parchment and pastry onto a baking sheet and place in refrigerator while you prepare the filling. 3. Preheat oven to 400˚F. In a medium bowl, mix the ricotta, Parmesan, and thyme leaves with a wooden spoon until smooth; set aside. Slice tomatoes in half. 4. Remove the baking sheet with pastry dough from the refrigerator. Spread the cheese filling evenly over the dough, leaving a 2-inch border bare around the edges. Spoon the halved cherry tomatoes over the cheese filling. Sprinkle with salt and arrange Nicoise olives on top. 5. Using a small, metal spatula, get underneath an edge of the pastry and gently lift over the filling. Brush the pastry with the beaten egg and again lift more pastry over the filling, pleating the dough as you go. The pastry is delicate and may break somewhat as you lift and pleat, but pressing with your fingers and brushing with the beaten egg will help it to adhere to itself. When finished, lightly brush any exposed pastry with the egg. Drizzle the tomatoes with a little olive oil. 6. Transfer the baking sheet to the preheated oven and bake for approximately 30 minutes, or until the crust is a deep golden color. Remove galette from oven and cool for 10 minutes before slicing, or allow to rest longer and serve at room temperature. TAKE a LOOK:   Last evening we invited the family of our daughter's boyfriend for an alfresco dinner on the patio. We had gorgeous weather and a wonderful time. My favorite part of the meal was the PIE! I think the only pie that can compete with a double crust peach pie is a double crust sour cherry pie. Or maybe a blueberry pie? But I also love rhubarb pies. Possibly a summer raspberry? What about lemon meringue? I suppose the best pie is the one you're eating at the time... I served the Peach Pie and the French Blueberry Tart with Ice Milk. Wish summer would never end... 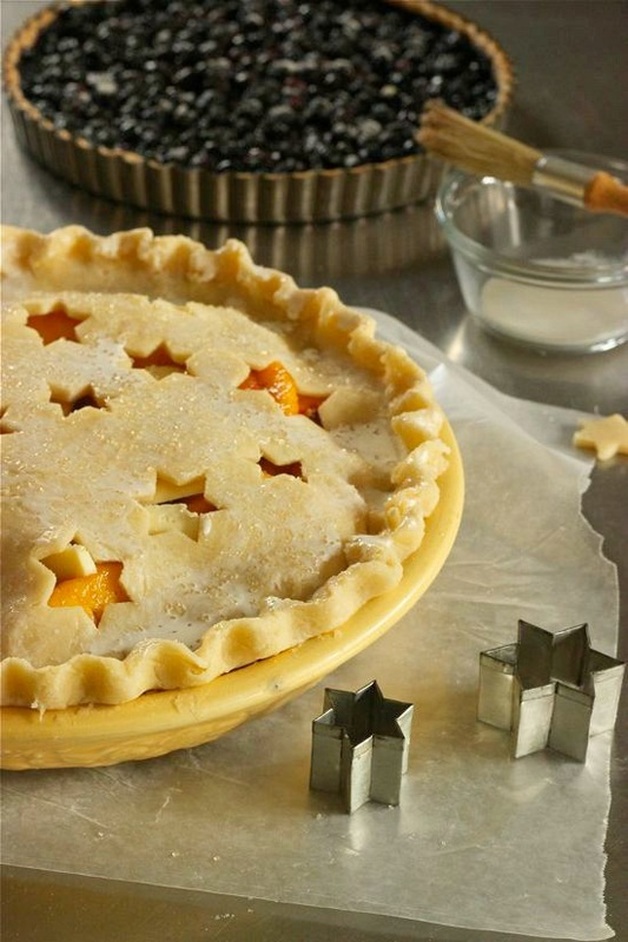  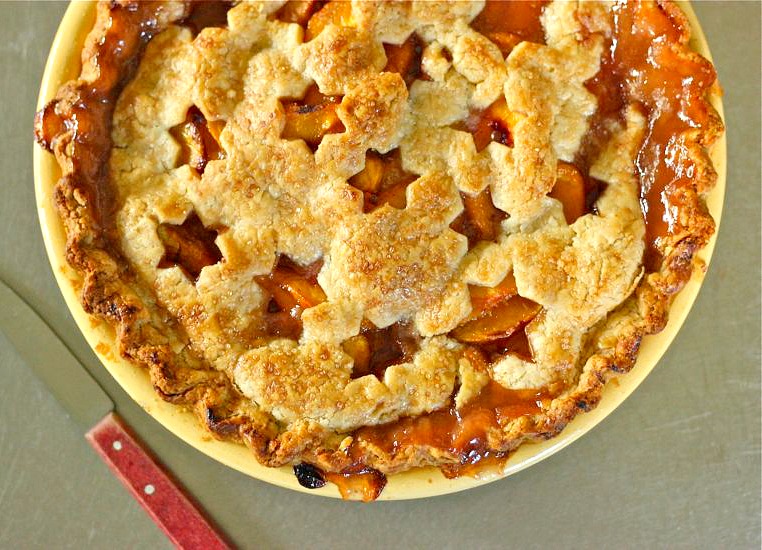  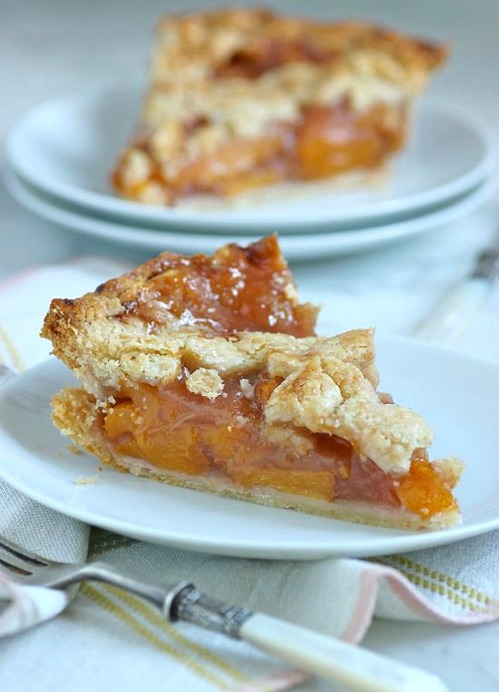  • recipe (adapted) by Kim Ima • Butter crust pie dough (recipe here) • 6 cups peeled and sliced fresh peaches • 1 teaspoon lemon juice • 1/2 cup dark brown sugar • 1/4 cup granulated sugar • 1/4 teaspoon ground cinnamon, nutmeg, or cardamom, optional • 1/4 teaspoon vanilla extract • 4 tablespoons cornstarch • 3 tablespoons butter + NOTE: The original recipe calls for baking the pie at 350˚F for 45 minutes. I knew immediately that I would not have any luck with that temperature or baking time and increased both. My changes are shown in the recipe below. 1. Preheat oven to 400˚F. 2. Roll out the pie dough and place the bottom crust in the pie dish. In a large bowl, toss the peaches with the lemon juice and sugars. Add the spices and vanilla, as desired. Add the cornstarch and stir to coat the peaches. Pour the peaches into the piecrust. Dot with butter. 3. Roll out the top crust and either make cut-outs in the dough as I did with the star cutters, or cut strips and make a lattice top crust. 4. Bake for one hour, checking your crust after 45 minutes. I had my pie in for 5-10 minutes after an hour of baking. Also, read the NOTE above. I also placed a sheet of aluminum foil on the rack below the pie plate to catch drips. 5. Remove pie from oven and let cool 6 HOURS before slicing. Yes... it is absolutely necessary to wait that long. The hot juices need to congeal. TAKE a LOOK: 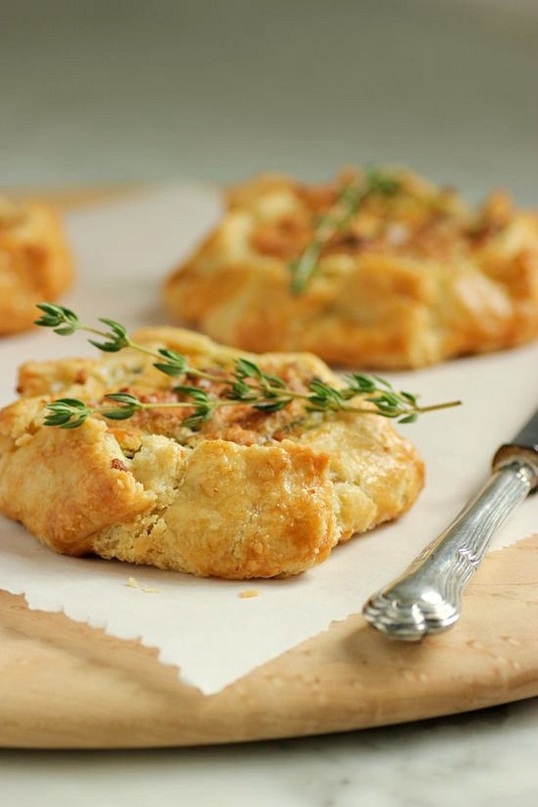  I continue to make and use fresh ricotta weekly (recipe HERE); just can't get enough of it! These individual savory galettes combine my love of pastry with lemon-infused ricotta, and zucchini from my garden... perfect! The filled tarts were our dinner last night, and the remaining leftovers our breakfast this morning.  I spent the better part of my day making the galettes, but it needn't be that labor-intensive.. The ricotta can be made ahead -- up to five days -- or purchased, but I highly recommend using homemade. And one or two days before you plan to bake the galettes, mix up the pastry dough and refrigerate. The shredding and draining of the zucchini can also be done ahead. ... A lovely little pastry for a summer meal.  • recipe by Amelia Saltsman, adapted | Bon Appétit, October 2008 CRUST • 2 cups all-purpose unbleached flour • 1/2 teaspoon salt • 3/4 cup (12 tablespoons) chilled, unsalted butter, cut into 1/2-inch cubes • 4 to 5 tablespoons ice water FILLING • 1 1/3 pounds (5 2/3 cups) coarsely grated zucchini • 1 1/4 teaspoons salt, divided • 2 tablespoons butter • 4 teaspoons extra-virgin olive oil • 1 cup finely chopped onion • 1 small garlic clove, minced • 2 teaspoons fresh lemon juice • 1/1/4 cups ricotta cheese, preferably fresh and preferably homemade • 1/3 cup grated Parmesan cheese, plus additional for sprinkling • 2 large eggs • 2 teaspoons finely grated organic lemon peel • 1/2 teaspoon freshly ground black pepper • Fleur de sel 1. Place the flour and salt in the bowl of a food processor. Pulse once or twice. Add the butter and pulse until the size of small peas. Add 4 tablespoons ice water, a little at a time, pulsing until moist clumps form. If mixture is too dry, add more water by teaspoonfuls as needed. Divide the dough between 2 sheets of plastic and form each into a disk. Wrap in the plastic and refrigerate about 2 hours. The pastry dough can be made two days ahead. Keep refrigerated until 10 minutes before you're ready to roll the dough. 2. Place the grated zucchini in a mesh colander set over a large bowl. Sprinkle with 3/4 teaspoon of salt and gently toss the mixture to distribute the salt. Allow zucchini to drain for 30 minutes. Transfer the zucchini to a large, cotton dishtowel. Wrap the towel around the zucchini and squeeze over the sink, removing as much moisture as possible. 3. In a 9-inch sauté pan, melt the butter along with the olive oil over medium heat. Add the onion and sauté until tender and translucent, approximately 7 minutes. Add the garlic, stirring constantly for 30 seconds until fragrant. Add the zucchini and lemon juice. Reduce heat to medium-low, and cook until zucchini is tender, stirring occasionally for approximately 10 minutes. Cool to room temperature. 4. In a medium bowl, whisk the ricotta cheese, 1/3 cup Parmesan, 1 egg, lemon peel, 1/2 teaspoon pepper, and the remaining 1/2 teaspoon salt. Stir in the cooled zucchini mixture. Refrigerate until ready to use. 5. Preheat the oven to 425˚F and position one of the racks in the center of the oven. Line a large sheet pan with parchment paper. Divide each disk of pastry dough into 3 equal pieces (for a total of six). In a small bowl, whisk the remaining egg; set aside. Place a square of waxed paper on your work surface. Dust the paper with flour and place one piece of pastry dough on top. Sprinkle the dough with a little more flour and cover with a piece of plastic wrap. Roll the dough into a round 6-inches in diameter. Place a 6-inch plate on top of the dough and trim with a sharp knife for a perfect round. Very gently, run the knife underneath the pastry. This will loosen the pastry from the waxed paper, making it easier to transfer once the galette is filled. Take a sixth of the filling and mound in onto the center of the rolled pastry, leaving about a 3/4-inch edge. Carefully lift the edge up and start pleating the pastry around the filling. This is when you will need to dip a pastry brush into the beaten egg and moisten the dough in between the pleats. This will help to secure the pastry during baking and avoid any sliding of the pleated dough Transfer the galette to the sheet pan and repeat with the remaining pastry and zucchini filling. When the six galettes have been placed on the sheet pan, brush the exposed pastry with some more of the beaten egg and sprinkle the tops with Parmesan cheese. 6. Place baking sheet in preheated oven. Bake for 15 minutes, then reduce heat to 375˚F and bake for approximately 20 minutes more, until golden. Remove from oven and let rest for 5 minutes before serving. The galettes can also be baked 4 hours ahead and served at room temperature if desired. + The Zucchini Galettes were served with buttery heirloom purple beans from my garden, baked speck spirals, and glasses of chilled French Rosé. TAKE a LOOK:  While we were "Up North" there were heavy rains at home in the Twin Cities the night before we returned. My beautiful English peas were crushed from the force. We gathered up all the peapods we could find on the vines and those knocked onto the ground. My husband gently lifted the plants and tried to provide additional support, but I think for this year, the peas are history. Last summer I was able to pick peas well through July and had expected to do the same this season; what a disappointment. So last night we had our farewell to peas dinner on our deck overlooking the garden. 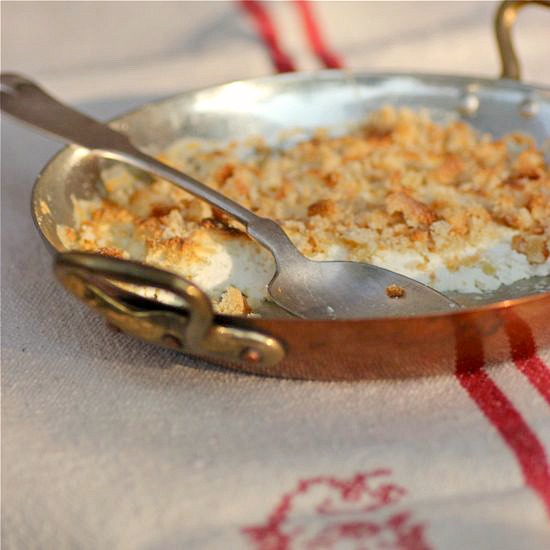 Peas with Baked Fresh Ricotta and Bread Crumbs. I had never purchased fresh ricotta before... lovely. Baked ricotta, toasted bread crumbs, and lemony peas. I served this along with grilled salmon. 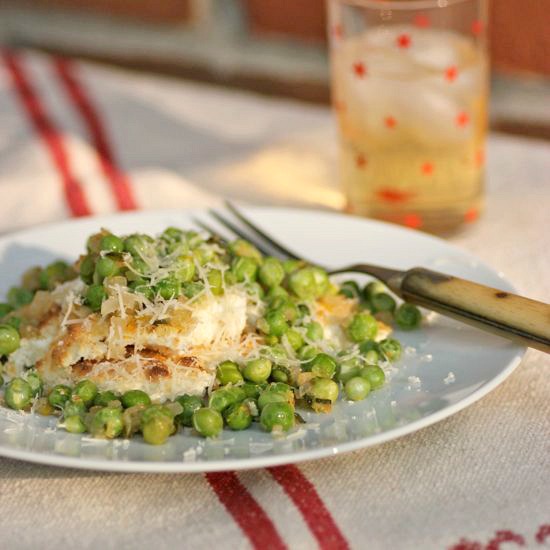  • recipe by Deborah Madison • Olive oil • 1 cup high-quality ricotta cheese, such as hand-dipped full-fat ricotta • 2 to 3 tablespoons fresh bread crumbs • 4 teaspoons butter • 2 large shallots or 1/2 small onion, finely diced (about 1/3 cup) • 5 small sage leaves, minced (about 1 1/2 teaspoons) • 1 1/2 pounds pod peas, shucked (about 1 cup) • Grated zest of 1 lemon • Sea salt and freshly ground pepper • Chunk of Parmesan cheese, for grating 1. Heat the oven to 375°F. Lightly oil a small baking dish; a round Spanish earthenware dish about 6 inches across is perfect for this amount. 2. If your ricotta is wet and milky, drain it first by putting it in a colander and pressing out the excess liquid. Pack the ricotta into the dish, drizzle a little olive oil over the surface, and bake 20 minutes or until the cheese has begun to set and brown on top. Cover the surface with the bread crumbs and continue to bake until the bread crumbs are browned and crisp, another 10 minutes. (The amount of time it takes for ricotta cheese to bake until set can vary tremendously, so it may well take longer than the times given here, especially if it wasn't drained.) 3. When the cheese is finished baking, heat the butter in a small skillet over medium heat. When the butter foams, add the shallots and sage and cook until softened, about 3 minutes. Add the peas, 1/2 cup water, and the lemon zest. Simmer until the peas are bright green and tender; the time will vary, but it should be 3 to 5 minutes. Whatever you do, don't let them turn gray. Season with salt and a little freshly ground pepper, not too much. 4. Divide the ricotta between 2 plates. Spoon the peas over the cheese. Grate some Parmesan over all and enjoy while warm.  I bought a flat of fresh picked strawberries while "Up North" and quickly got to work on a strawberry tart with pastry cream when I returned. I took some liberties with the crust by substituting large, coarse, strawberry sugar from Paris for the standard granular sugar in the recipe. Delightful. I believe you need to make at least one tart with pastry cream and local berries each summer. You just have to... so delicious.  • adapted recipes from Sunset magazine | July 2015 TART DOUGH: • 1 2/3 cups flour • 1/3 cup sugar • 1/4 teaspoon fine sea salt •1/2 cup cold unsalted butter, cubed, plus more for pan • 1 large egg yolk • 1/4 cup heavy cream • 1 teaspoon vanilla extract 1. Combine flour, sugar, and salt in the bowl of a stand mixer. Add butter. Using the paddle attachment, mix on low speed until butter is smaller than pea-size. Whisk egg yolk, cream, and vanilla in a small bowl and add to the flour mixture. Blend just until dough comes together and is smooth. 2. Form dough into a disk. Wrap in plastic wrap and chill at least 2 hours and up to 4 days. 3. Lightly butter a 10-inch tart pan. Roll dough out between 2 sheets of lightly floured waxed paper or parchment paper until 1/4 to 1/8-inch thick. Roll dough onto rolling pin, then unroll over tart pan. Gently press dough flush against bottom, into bottom corners, and up inside of pan. Using the rolling pin, trim the dough along the top edge of the tart pan. Place pan in refrigerator to chill and preheat the oven to 375˚F. 4. Once the oven is preheated, remove tart pan from refrigerator and line dough with foil. Fill with dried beans, rice, or pie weights. 5. Bake tart shell until edges are light golden brown, about 20 minutes. Carefully remove the foil and beans. Return tart shell to oven and continue to bake until center looks dry and is starting to turn deep golden brown, about 15 minutes more. Remove from oven; let cool completely before removing pan rim and filling shell. VANILLA PASTRY CREAM: • 1 cup each whole milk and heavy cream • 1 vanilla bean, split lengthwise and seeds scraped out and reserved • 4 large egg yolks • 1/2 cup sugar • 3 tablespoons cornstarch • 1/2 teaspoon fine sea salt 1. Heat milk and cream in a medium saucepan over medium-low heat until it begins to simmer. Add vanilla bean pod and seeds; let set off the heat, covered, 30 minutes. 2. Mix yolks and sugar in a medium bowl. Blend in cornstarch and salt. Rewarm milk mixture over medium high heat until almost simmering. Slowly whisk hot milk mixture into yolk mixture, 1/2 cup at a time. Pour mixture back into pan and cook, whisking constantly, until as thickened and mixture coats the sides of a wooden spoon, about 3 to 4 minutes. Pour custard through a strainer into a clean bowl, discarding vanilla bean. 3. Press a sheet of plastic wrap against the surface of the custard to keep a skin from forming. Chill for at least 3 hours and up to 4 days. 4. Whisk cold custard to smooth out any lumps, then spread into tart shell. ASSEMBLY: 1. Top the pastry cream with hulled strawberries or any other type of berry or combination of berries. Brush the berries with melted currant jelly. Chill tart until ready to serve. TAKE a LOOK: 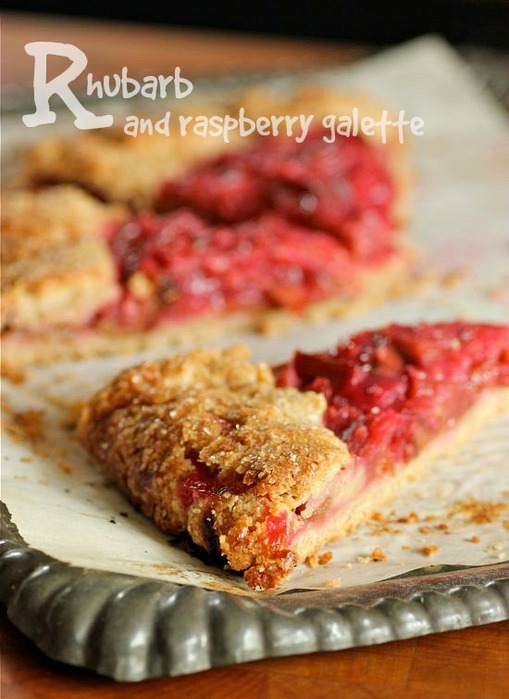 I am in my element. I have been spending a good amount of time outdoors preparing and planting my vegetable garden. Peas, radishes, lettuces, haricot verts and pole beans are well on their way. I have been cutting asparagus which were made into a cream soup. Strawberry plants and blueberry bushes are dripping with blossoms. And as you can see, rhubarb has been baked into a galette. It's the time of year I absolutely treasure. It doesn't get any better than this... eating meals from my own garden.  This free-form tart (galette in France, crostata in Italy) included raspberries. I often combine strawberries with my rhubarb, but very rarely raspberries. I loved it! 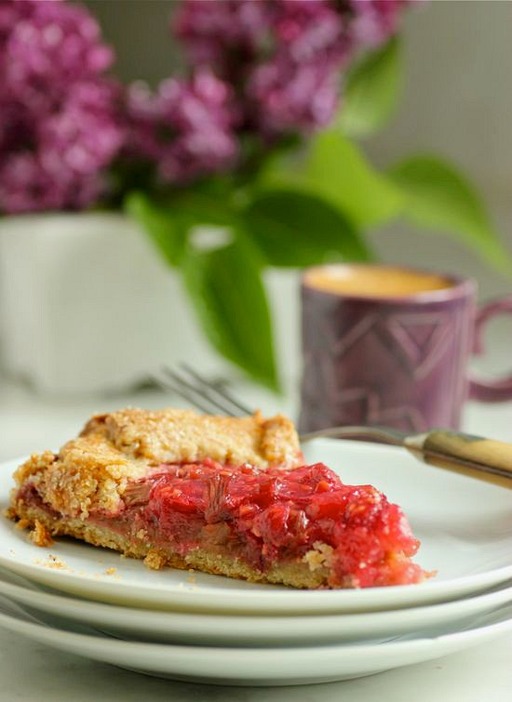 I believe the most important step in making a galette is brushing egg wash in between the pleats of crust surrounding the edge of the tart. It works like glue to hold the shape of the galette. Otherwise, the overlapping pleats will tend to slide apart during baking. Serve the just-baked Rhubarb and Raspberry Galette with whipped cream, as we did the day of baking, or plain, the way we ate it the following morning along with our espresso. 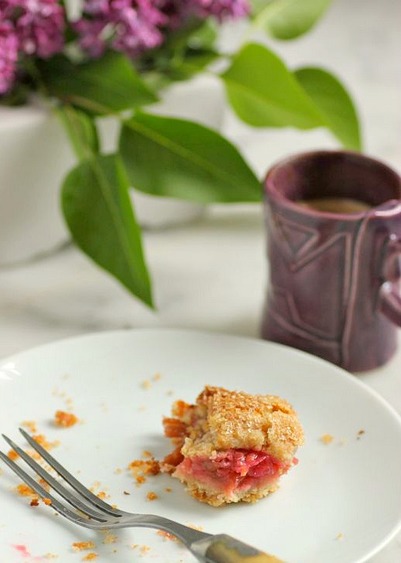  + recipe by Karen DeMasco | Locana Verde, NYC CRUST: • 1 cup unbleached, all-purpose flour • 1/2 cup whole wheat flour • 1 1/2 tablespoons sugar • 1/2 teaspoon kosher salt • 3/4 cup chilled unsalted butter, cubed • 1 large egg • 1 tablespoon whole milk FILLING: • 1/4 cup cornstarch • 4 cups 1/2-inch-thick slices rhubarb • 1 6-ounch container fresh raspberries • 1/3 cup sugar • 1 large egg, beaten • Turbinado sugar • Sweeten whipped cream or vanilla ice cream for serving (optional) 1. Combine flours, sugar and salt in the bowl of a food processor. Pulse once or twice to combine. Add the chilled cubed butter and pulse until the size of tiny peas. Whisk together the egg and milk and slowly pour into the flour mixture while pulsing. When dough just begins to come together, stop and transfer to a sheet of plastic wrap. Press into a disk and wrap completely. Place in refrigerator and chill for at least 1 1/2 hours. 2. For the filling: Dissolve cornstarch in 3 tablespoons cold water in a small bowl. Set aside. Combine the rhubarb, raspberries, and sugar in a heavy saucepan. Cook over medium heat, using a rubber spatula to gently stir the mixture until the sugar dissolves and juices release, about 4 minutes. Stir in the cornstarch mixture and bring to a boil (rhubarb will not be tender and slices should still be intact). Transfer to a bowl. Chill until cool. Forty-five minutes in refrigerator is ideal. 3. Preheat oven to 400˚F. Remove dough from refrigerator. On a lightly-floured sheet of parchment paper, roll the dough into a 12-inch round. Brush the round with beaten egg. Mound the cooled filling onto the center of the crust and gently spread the filling, leaving a 2-inch border. Gently and carefully fold the unfilled border over the filling, pleating the dough as you go around. When finished, brush the edge and in between the pleats with the remaining beaten egg. Slide the parchment and filled crust onto a baking sheet and transfer to the middle rack of oven. 4. Bake the galette for approximately 45 minutes, until the crust is golden brown and the filling is bubbly. You might want to place a sheet of foil below baking sheet to catch any juices that may accumulate. Cool the galette on baking sheet on a rack. Cut into wedges and serve with whipped cream or ice cream if desired (but not necessary). TAKE a LOOK: 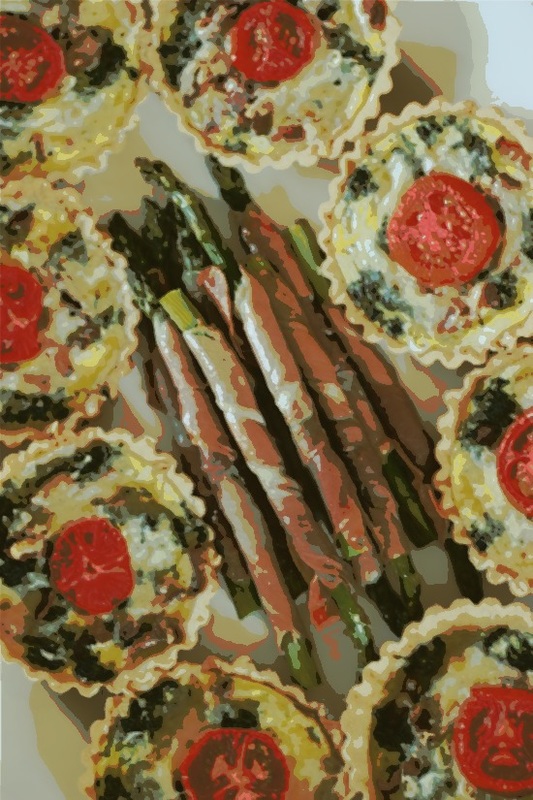 Good friends of ours moved away last year. They didn't go far. They still live in St. Paul. But they have gone from being a block away to about two miles away. It's distant enough that we don't see or run into our friends very often. Last weekend we visited them in their new (fabulous old) home and I took along some small bites; a couple of my favorites -- individual spinach-bacon tarts with gruyère and roasted asparagus wrapped in prosciutto. I'm hoping to make platters like this soon for alfresco dining (while trying to ignore the forecast for next week of rain mixed with snow!). • Recipe for SPINACH-BACON TART • Recipe for ROASTED, PROSCIUTTO-WRAPPED ASPARAGUS  TAKE a LOOK: 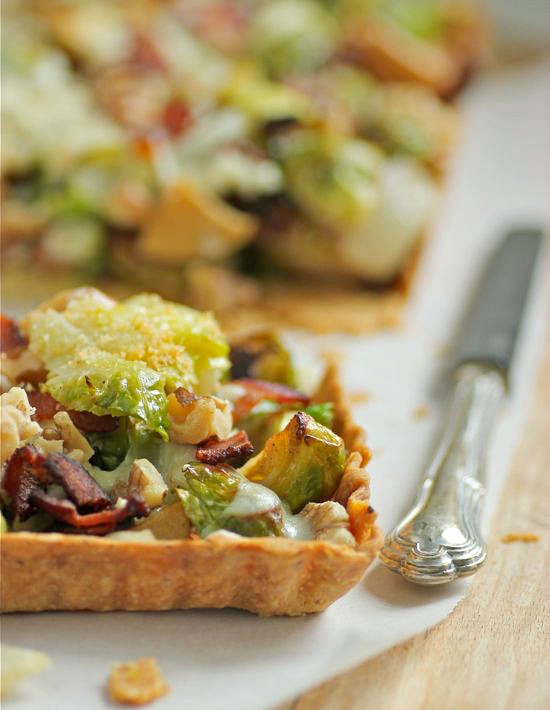 Recently I was contacted by a company asking me to promote their lifestyle by writing a post on my philosophy for healthy living in Minnesota during the winter months... and to create a recipe to accompany my musings on wellness. Honestly, I don't know what it was about Passions to Pastry that made me seem like a plausible candidate for this. I dislike being outdoors when it's cold and much of what comes out of my kitchen includes fat, usually in the form of butter.  What I first considered a very odd request, eventually got me thinking about my general health. Do I exercise enough, especially in the winter? Even though I'm in my kitchen cooking and baking for hours every day, do I really eat well? And probably my biggest concern... how is my mental health? Something I believe is connected to exercise, good nutrition, and a positive attitude (which is sometimes lacking in my winter demeanor). While I was thinking about all of this today, my husband had a health assessment at the health club where we belong. He was told that he must be eating really good fats, because numbers and percentages on his tests were excellent. We eat butter. I bake with butter and I cook mostly with olive oil. We eat eggs. LOTS of eggs. I only purchase whole milk and whole milk products, such as yogurt, sour cream and cottage cheese. I do not believe in low-fat or non-fat. Seventeen years ago I eliminated hydrogenated oils from my kitchen and our lives. That changed everything. It's a no brainer as far as I'm concerned. And I must ask... why do doctors' offices and hospitals serving coffee to their patients, always offer a powdered creamer that's full of hydrogenated oils? It makes absolutely no sense whatsoever. 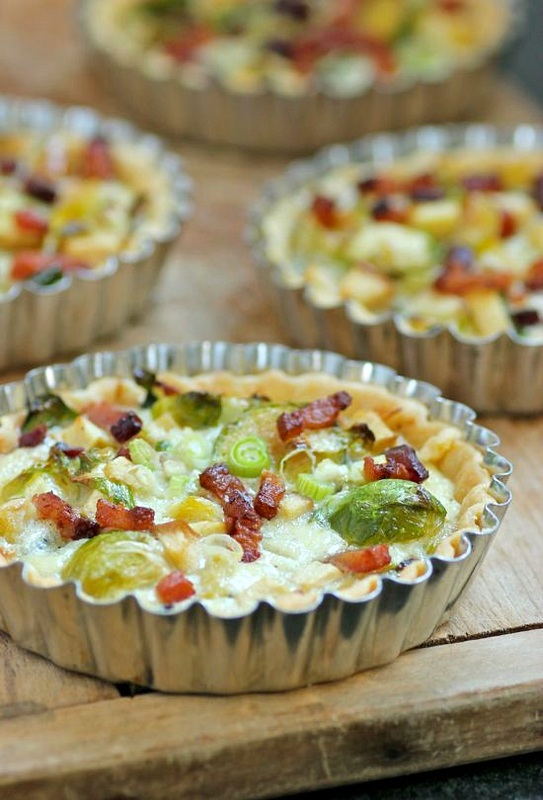 Summers are easy for me. I spend much of my time in my vegetable garden, bike 15 to 20 miles several times a week along the Mississippi river, and entertain often, serving alfresco meals on the patio made with organic produce from my garden. That is when I am the happiest... and healthiest. Admittedly, winter becomes more difficult. I tend to hibernate, filling my time with indoor projects, baking of bread, and thoughts plus plans for the upcoming gardening season... and travel; something I prefer doing during the summer months instead of winter. It's a balance and a trade-off I cherish. I can't imagine living anywhere else. 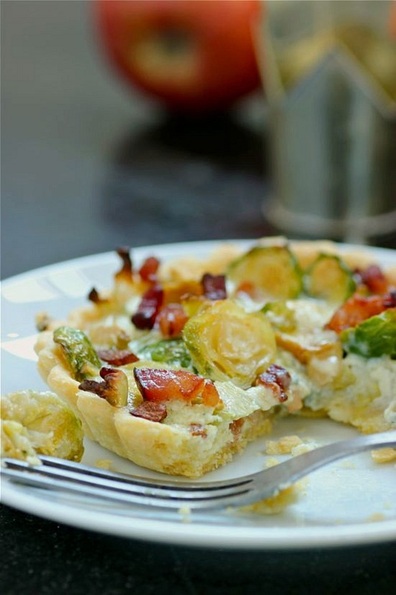 I often make savory tarts during this time; combining a flaky pastry with healthy fruits and vegetables in addition to rich cheeses, eggs, and cream. (Make this a vegetarian version by removing the bacon and adding chopped walnuts.) Meals like this help get me through a long, northern winter! 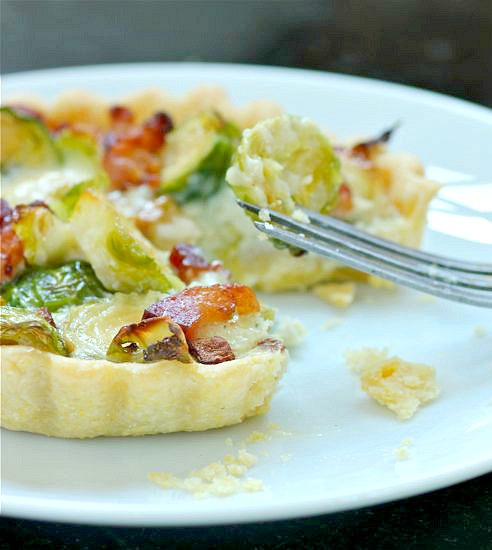  • recipe makes six 4-inch tarts or one 10-inch tart CRUST • 1 1/4 cup unbleached all-purpose flour • 1/4 cup cornmeal • 1/2 teaspoon salt • 8 tablespoons cold unsalted butter, cut into 1/2-inch cubes • 3 to 4 tablespoons ice water FILLING • 4 strips apple-smoked bacon • 10 ounces brussels sprouts • 1 small apple, diced (I used Fuji) • Olive oil • 3/4 cup blue cheese, diced • 1/2 cup Half & Half or whole milk • 2 large eggs • Salt and freshly-ground pepper • 2 green onions, white and pale green part, thinly sliced 1. To make the crust... Combine the flour, cornmeal and salt in the bowl of a food processor. Pulse a couple of times. Add the butter and pulse until the size of small peas. Add the ice water, 1 tablespoon at a time, while pulsing until the dough just starts to come together. You will use 3 to 4 tablespoons of water. 2. Transfer the tart dough to a large piece of plastic. Press into a disk, wrap in the plastic; place in the refrigerator for 1 to 2 hours. 3. In the meantime, make the filling... Slice the bacon into 1/4-inch pieces. Place bacon in a skillet over medium-low heat; cook until brown but not crisp. Drain and set bacon aside. 4. Preheat oven to 375˚F. Trim and slice brussels sprouts. Cut the apple into small dice. Combine on a baking sheet with 1-inch sides; drizzle with olive oil and sprinkle with salt and pepper. Bake in the center of the oven, stirring occasionally, until the brussels sprouts just start to brown, about 20 minutes. Remove pan and increase oven temperature to 400˚F. 5. Remove the tart dough from the refrigerator and transfer to a work surface. Place the disk on a sheet of lightly-floured wax paper or parchment. Dust the top of the disk lightly with flour and cover with a sheet of plastic wrap -- If making individual tarts, divide the dough into 6 equal pieces before rolling. Roll the dough slightly larger than the tart tin(s) and gently press into the pans. Do not stretch the dough. Trim the top edge and place in freezer for 5 minutes. Remove and line pan with a piece of aluminum foil. Fill with dried beans or rice, transfer to the preheated oven, and bake for 15 minutes. Remove the foil and beans and return the tart pan(s) to oven. Continue to bake until crust is golden brown. Remove and reduce oven temperature to 375˚F. 6. Scatter the blue cheese evenly onto the tart crust (or divide equally between the individual tarts). In a medium bowl combine the cream or milk with the eggs and salt and pepper to taste. Whisk by hand just briefly until smooth. Add the sliced green onions. 7. Fill the tart shell(s) with the brussels sprouts-apple mixture. Sprinkle with the reserved bacon and slowly pour the egg mixture over the filling. 8. Bake in the center of the oven for approximately 20 minutes, or until the custard filling is set. Great for a light dinner with a salad or as part of a brunch. TAKE a LOOK: 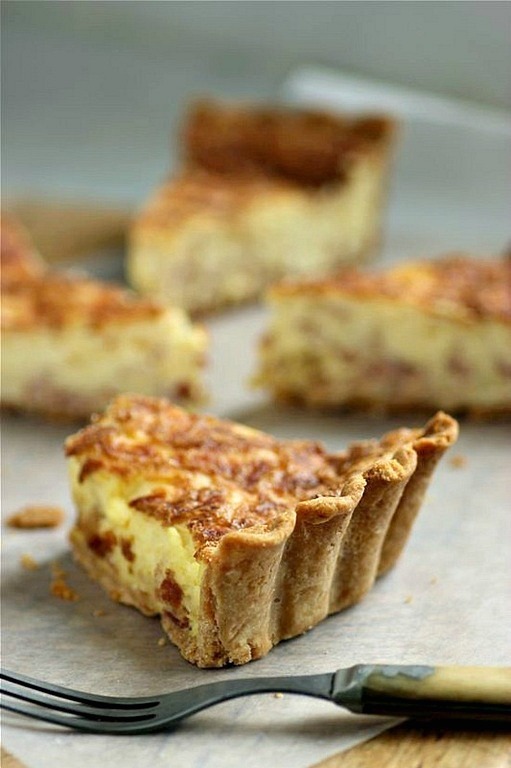 I am extremely fond of all things custard; possibly fueled by my aunt's baking of sweet custard pies for me when I was very young. If I order dessert after a restaurant meal, I will choose Crème Brulée over anything else on the menu -- always. 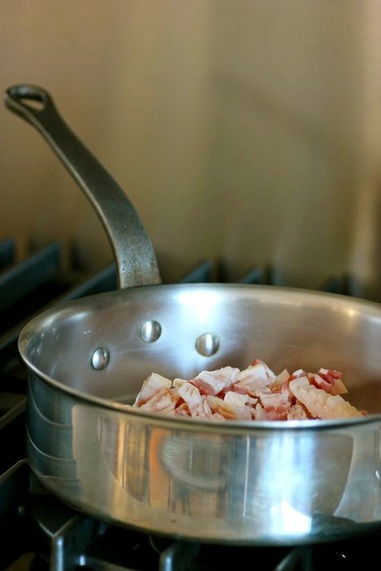 When I made my favorite Quiche Lorraine recipe the other night, I pleaded with my daughter to take a bite. Pleaded and begged, because my daughter is not a bacon eater. She did, however, give it a try and agreed... it's the best. The custard filling in this classic Quiche Lorraine is the creamiest you could ever imagine. I started joking about opening a small (and certainly successful) café called Quiche. My daughter countered with, Just Quiche. I ended with, Just One Quiche... this one, and nothing more.  Quiche Lorraine • 1 partially baked deep, 9-inch tart crust, recipe follows • 12 ounces apple-smoked bacon, cut into 1/2-inch pieces • 6 large, organic eggs • 2 8-ounce jars of crème fraîche, recipe follows • 1/2 teaspoon kosher salt • 1/8 teaspoon freshly grated nutmeg • 5 ounces grated Gruyère cheese 1. Preheat the oven temperature to 375˚F. 2. In a medium skillet, cook the bacon until just crisp. Transfer to a paper towel and drain. 3. In a medium bowl, whisk the eggs; add the crème fraîche, salt, and nutmeg and whisk to blend. Slowly pour the egg custard into the partially baked tart crust. Sprinkle the cooked bacon on top and then cover with the grated Gruyère. 4. Place the tart pan on the middle rack of the oven and back for 40 minutes, or until the filling is just barely set. 5. Allow the quiche to rest for about 5 minutes before slicing. 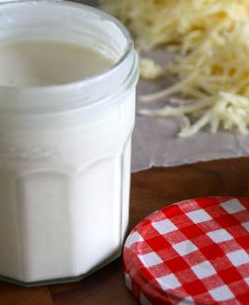 Crème Fraîche • 1 pint heavy cream (do not use ultra-pasturized) • 4 tablespoons buttermilk Using 2 jars with lids (I like the French Bonne Maman jam jars), divide the buttermilk and then the heavy cream equally between the two. Secure the lids, then set the jars on your kitchen counter at room temperature for 24 hours; refrigerate. You will need to plan ahead and begin the Crème Fraîche at least 2 days ahead of making the quiche. Tart Crust • 1 1/2 cups unbleached, all-purpose flour • 1/2 teaspoon kosher or sea salt • 8 tablespoons very cold, unsalted butter, cubed • 4 tablespoons ice water 1. In the bowl of a food processor, pulse the flour and salt. Add the butter and pulse until the butter is the size of small peas. Slowly add the ice water, pulsing the mixture until the dough just comes together. Transfer the mixture to a large piece of plastic wrap, press the dough into a disc and wrap. Refrigerate for about 2 hours. 2. Remove the dough from the refrigerator and place on a sheet of waxed paper dusted lightly with flour. Dust the top of the dough lightly with a bit more flour, then cover with plastic wrap. Roll the tart dough into a large circle. Transfer the dough to a 9-inch deep dish tart pan with a removable bottom, and gently press the dough into the bottom and up the sides. Using the rolling pin, trim the dough along the edge of the tart pan. (If you have any breaks in the tart crust, use remnants of dough to patch holes). Place the dough-lined tart pan in the freezer while you preheat the oven to 400˚F. 3. When ready to bake the crust, remove the tart pan from the freezer and line with foil. Fill the tart pan with dried beans or rice and place the pan on the middle rack of the oven. Bake for 15 minutes; carefully remove the foil and beans or rice. (Check again for any small cracks before adding the custard and baking and patch before the final bake). Return the tart crust to the oven and continue to bake until it is dry and light golden. Remove from the oven. It is now ready to fill with the custard. TAKE a LOOK: |


Categories
All
|